Friday, 14 October 2016

Best Free 2016 Keyword Research Tool For your Website

Best Free 2016 Keyword Research Tool For your Website

Keyword research plays an important part in your website post. It can make your website/blog post popular or it can make it completely vanish your blog post. So to do keyword research, here are some of the best free 2016 keyword research tool that will make your blog post visible in this web world. 

Best Free 2016 Keyword Research Tool

Google Keyword Planner 

Talking about the free 2016 keyword planner Google Keyword Planner is ranked on the number one list. Here it is the free keyword researcher from google. To use it, you first need to signup at Google Adwords and then under tools you will find Keyword Planner. 

Google planner has variety of functions such as you can set target and you can apply a lot of keyword filters as well as it show the competition, average monthly search and other data that will exactly help in finding the right keyword for your website. 

If you own a small website then it's the best tool but now in 2016 Google had ranged (1M-10M) the keyword data for account that had no campaigns running. So it's better to use Keyword planner in parallel with other tools.

SeoStack Keyword Tool 2016 

SeoStack is chrome extension that is used for free keyword search. You just need to  download it to your chrome browser. To use seostack, click on the extension icon and it will then lead you to the keyword research website where you will enter your desired keyword. And you can also select the sources from where you want to look for  keyword.

Seostack is very simple tool which give you the option to select the country. It also shows the rank of the keyword in a search engine with big keyword trail. Also you can get keyword and volume data but it redirects to the google keyword planner. But this keyword is good for beginners. You can get Seostack Keword tool from chrome web-store.

Google Autocomplete

Google autocomplete is not a keyword research tool, but it is a technique to find out what people are searching on Google in large amount. I myself use this technique for my YouTube channel and it works a lot of time. So start using this free google autocomplete keyword research 2016 technique. 

Google Trends 2016 Keyword Research Tool

If you run a website which post about trending content then Google Trends is the best keyword tool for you. Google trends shows the data data of the latest popular searches that are going on in your Country. And also it can shows the keyword research data on your favourite topic. 

Just access Google Trends and look for  a trending interesting topic and start posting. However this research tool will only give you an idea of trending keywords. And it will be best to use with Google keyword planner.

Ubersuggest 2016 widely used Free Keyword Research tool

Ubersuggest is the free and most widely used tool for keyword research. It is loved by bloggers who had just entered into to web-world. The best part of this keyword research tool is that, it reads keywords from web, images, shopping, news and YouTube. And that's a plenty of keyword data on your hands.

Just access Ubersuggest and find the best keywords. And it also let you select your keywords so that you can use them later. 

HyperSuggest Free Keyword Research tool 2016

Another free keyword tool of 2016 is HyperSuggest which is liked bye the online community. This tool look the kewords on Google, Google shopping and YouTube. It can also reverse suggest keywords. 

Hypersuggest supports adding modifiers to suffix and prefix and it allows you to product more keywords. It also have predefined modifiers such as who, why, how and others to make search friendly keyword trails. Navigate to the Hypersuggest website and look for your keyword data.

Bing Webmaster Tools A free 2016 keyword research tool by Bing

Bing webmaster tool is a free keyword analyser tool from bing which only show the data from the Bing search engine. It almost shows the search volume data from the Bing. But it will be useful for those who wants to target people  who use Bing for their daily search.

Conclusion on Free 2016 best Keyword Research Tool 

As each keyword tool has it's own value and research mechanism, so these tools are very important for a blogger or a website content creator. Even you can use free 2016 keyword research tool for your YouTube videos. You can make searches too. These all keyword research tools provide a high quality data on keywords.

So go ahead and start using these all free 2016 best keyword research tools and you will see the improvement in your website's traffic.

Saturday, 8 October 2016

iPhone 7 And Reliance JIO

iPhone 7 and Reliance JIO offer
With the Launch of iPhone 7, 7 Plus in India, Reliance JIO also announced something exciting to it's customers. If you are a Reliance JIO user and you are planning to buy iPhone then JIO yesterday announced that it will provide 1 Year free JIO services to the people who will buy a new iPhone.

So if you are excited for iPhone 7 then you can order iPhone 7 from Amazon exclusively !

Which iPhones will be Eligible For Reliance JIO 1 Year Free Service 

Every person who have a Reliance JIO connection, purchasing a new iPhone 7, iPhone 7 Plus , iPhone 6S, iPhone 6s Plus or iPhone SE at Reliance Digital and selecting APR and AAR will be eligible for this reliance JIO offer.  

Under this offer the services are over Rs 18,000 which include unlimited local, Std, national roaming voice, unlimited SMS, 20 GB of 4G data, 40GB of WiFi data, unlimited 4G data at night and unlimited access to reliance premium apps. 

An exclusive discount will be provided to all the Enterprise customers on iPhone from Reliance Digital with special digital tariff plans.

With Reliance JIO iPhone users will be then experiencing very high speed internet, HD voice calling, buffer free face time and a lot other benefits.

iPhone Available At Amazon.in 

If you are looking Desperately for an iPhone and tired of long queue at Apple Stores, there here is very easy solution for you. Your new iPhone is now available on Amazon and you can buy iPhone 7 on Amazon.in.

And as with the new iPhone 7 and iPhone 7 Plus launch, there is a degrade in old iPhone models.

Price List of iPhone From Amazon

iPhone 7 (Gold, 128 GB) Amazon India
iPhone 7 (Gold, 128 GB) 
  • 4.7 -Inch Retina HD Display 
  • 3D Touch, Water and Dust Resistant
  • A10 Fusion Chip with M10 motion co-processor
  • 12 MP  primary cam, 7MP front
  • 4K at 30 FPS, Slow motion 1080 at 120 FPS
  • 3GB RAM, iOS 10
Limited Offer for Rs 70,000
Buy iPhone 7 online (Gold, 128 GB) Amazon India


Buy iPhone 6S online !


iPhone 6S (Rose Gold, 16GB)
  • 4.7 Inch Retina HD Display
  • 3D Touch
  • A9 Chip
  • 12MP Pictures, 4K Videos
  • 64 Bit Architecture 
  • Finger Print Sensor
  • RAM 2GB
  • 5MP Front Facing
  • 4G Enabled 
Limited Offer for Rs 39,999
Used iPhone 6S for Rs 30,800

Buy iPhone 6S at Discount !


Buy iPhone 6 Plus online !
iPhone 6 Plus (Space Grey, 64 GB)
  • 5.5 Inch  Retina HD Display 
  • 8MP iSight Camera
  • A8 Chip
  • 1080p HD video at 60fps
  • Slo Mo Video at 240fps
  • Touch ID Sensor
  • iOS 8
Limited Offer for Rs 48,999

Buy iPhone 6S online !


iPhone 5S (Silver, 16GB)


  • 4 inch Multi Touch Retina Display
  • 8MP Primary Camera
  • 1.2 MP Front Facing camera
  • A7 Chip
  • Motion Dector co-processsor
  • Touch Sensor
  • RAM 1GB
  • Finger Print Identity Sensor
  • Advance Security Features
  • High resolution Touch Screen
Limited offer for RS 19,999

iPhone 5S Buy online at Discount !


For Further more Updated iPhone Price follow Amazon iPhone Landing Page.


iPhone at Flipkart 


Buy iPhone online at Flipkart

Check out the latest Price list of iPhone at Flipkart 


Fusion of Reliance JIO with iPhone

The Reliance JIO offer with iPhone 7 and other iPhone models definitely will rock and rule the heart of new iPhone buyers. Also Reliance had played their strategy to wash Hands in the trending iPhone river. Though it is not just the River. 

There are a lot more people crazy out there for latest iPhone.   So have you got your iPhone ? Or you are planning to buy with Reliance JIO offer. Tell us in comments, what you think about this Offer by Reliance JIO.

Tuesday, 4 October 2016

How To Convert Video to Audio Using VLC Media Player

How To convert Video to Audio Using VLC Media Player
Vlc media player is the most and popular media player and you probably use it as your primary media player. As it supports a lot of video as well as audio formats. But today we will talk about it's extra functions apart from playing video and audio.

Apart begin a video player, VLC can convert video to audio very easily and perfectly. Also it support a lot of other functions, such as screen recording, video format conversion, video to audio and lot more. This video payer was created by a group of students at Ecole Central Paris under their college project and was designed for serving videos from satellites at the campus. Now this player is developed by contributors worldwide and is Coordinated by Video Lan.

How To convert Video to Audio in VLC 

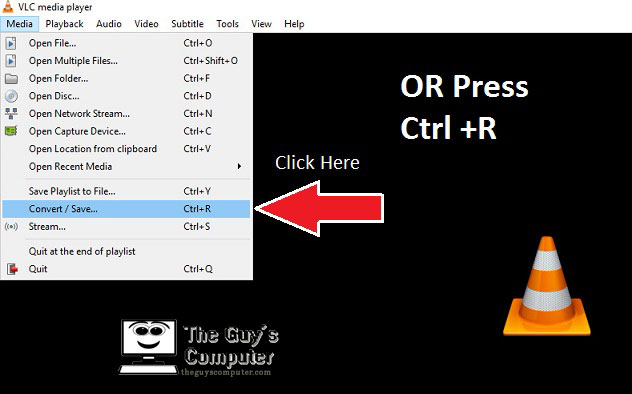
To convert video files into audio first open VLC Media player and then Press "ctrl+r" Or Go to "Media" tab and click on "Convert/Save"
How to convert Video to Audio using VLC media player


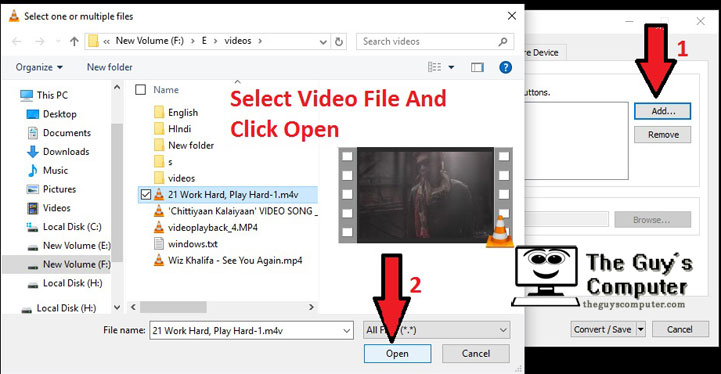
Now another window will open in which you need to add your video file which you want to convert into audio file. Now Click on "Add" and select your video file and click Open. 
How to convert video to audio using VLC Media Player (Step 2)


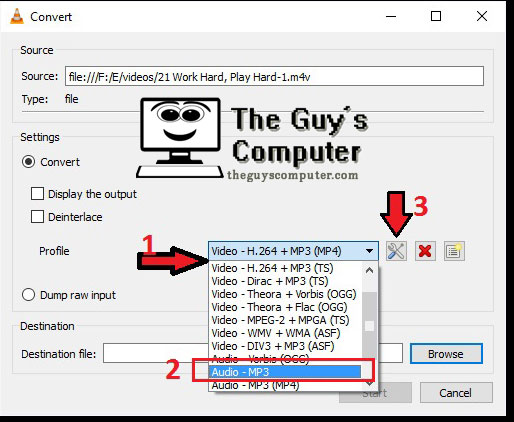
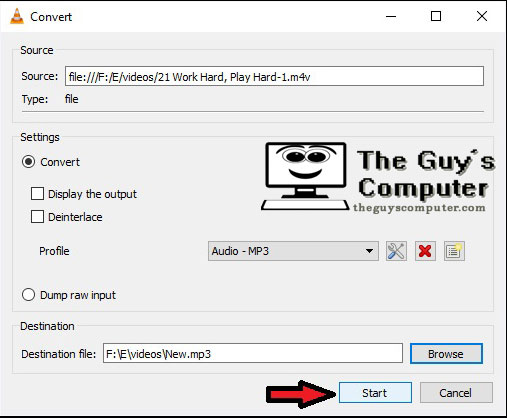
Now click on Next. Now in the new window under the setting, you need to change the Profile and Choose Audio - MP3 from that drop down menu. And after that click on Setting icon right to it.
How to convert Video to Audio Using Vlc media player ( Step 3)  

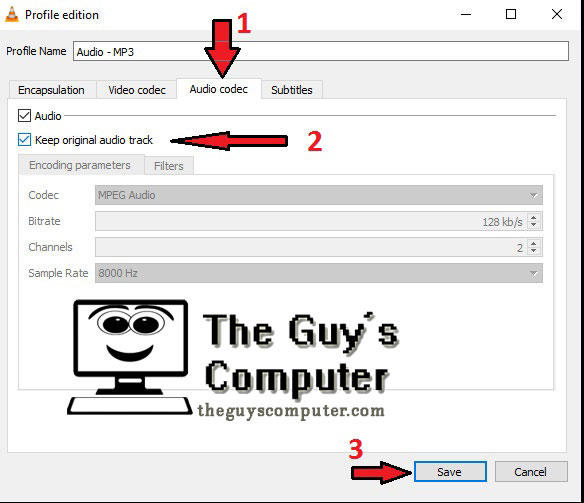
Now Under Encapsulation tab make sure that the check mark must be on MP3. After that click on "Audio Codec" tab. Now check mark the "Keep original audio track" or if you want a low quality audio then  un-check "Keep original audio track" option and then you can change the Codec, Bit-rate channels or Sample rate. However you can change the bit-rate to 64 Kb/s to get a low quality and small sized audio file. But I will recommend not to do that.
How to convert Video to Audio using VLC Media Player (Step 4)


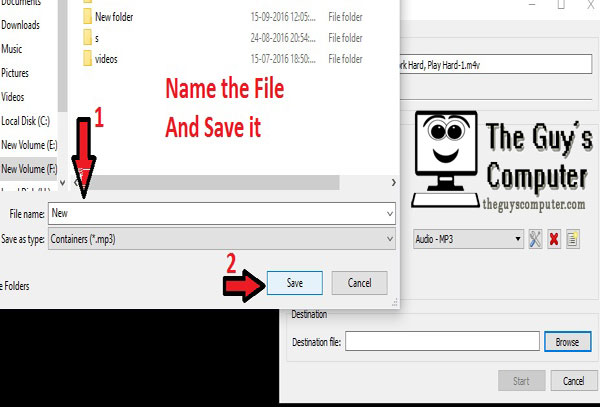
Now press Save. And now choose the output destination where you want to save your audio file by clicking on Browse. 
How to convert Video to Audio Using Vlc Meda player (Step 5)


And as soon as you will name the file and press save then click on Start. After Few Seconds you will get the audio from the video. 
How to convert Video to Audio using VLC Media Player (Step 6)


More VLC Functions

Other than Video to audio conversion, VLC media player can do other things like conversion of mp4 video to flv and various other formats. 

To convert a video format into other,you have to follow same above steps but in profile you need to select the video Profile.

VLC Media player can record your Screen 

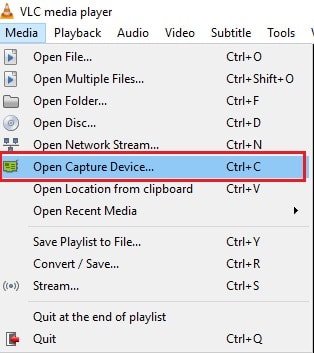
If you want to record a part of your screen, then all you need is VLC media player installed. To record your screen follow these steps.

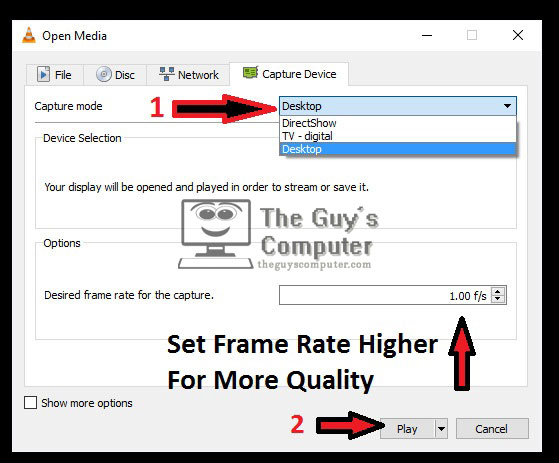
Press "Ctrl +C" to open device capture.
How to Capture Screen Using VLC Media Player


Now change the "Capture Mode" to "Desktop". Now you can select the frame rate. Higher frame rate will capture high responses and fast movement of mouse and other actions. Now click on "Play"

How to Capture Screen using VLC


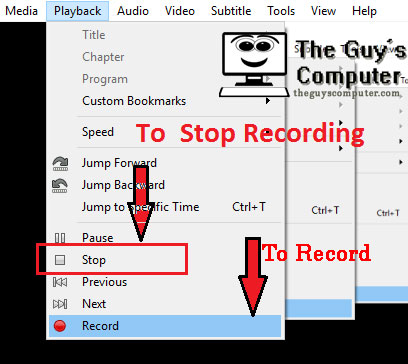
But right now it has started playing your desktop. Now to Record click on the "Playback" tab and from that menu select "Record".

How to record screen using VLC media Player

Now VLC player will record every things on your desktop. And to Stop recording press Stop. And the recorded file will save into "Videos" folder.

Now the saved file will be in videos folder But it's too big you need to convert it to make it small. And VLC is capable of converting 1 GB file into few MB. 


How cool is that! 


Take Snap Shots With VLC Media Player


You have been recording your awesome moments and now you want to share those moments with the world, but the video File is large enough and a time taking task. So the idea about the stills, is the best !


But where to find stills from ? 

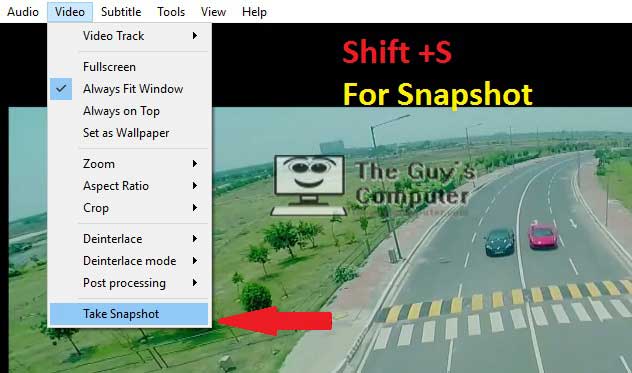
So now VLC is saviour that can take snapshot from your captured video. To get snapshot click on "Video" tab from the menu bar and you will find there "Take a Snapshot" or you can try Shortcut key "Shift +S". And you will find the snapshot in Pictures.
How to capture snapshot using VLC media player

Final Verdict About Video To Audio Conversion Using VLC

Finally we have learned to convert video to audio using vlc media player. With this we also have learned a lot about VLC media player capabilities. 

It's a nice software which can do simple tasks. But For hardcore things there are dedicated software. 

So if you are thinking to use VLC for simple purpose rather than just video watching then it's fine. 

Now start converting your videos to audio by vlc and if you have found more cool functions of VLC then share with us and keep exploring.

Thursday, 22 September 2016

How To Share An Internet Connection

How To share an internet connection
So if you are wondering to share your internet connection with your friends or your other devices then you can do it easily without any prior knowledge regarding networking. After we had learned how to create a hotspot in our previous article, now it's time to share the internet connection from that hotspot.


How To Share An Internet Connection 

Before sharing your internet connection first, make sure that from which device you are  connected to the internet on your PC. It can be your Ethernet connection, Wifi or any USB modem. 

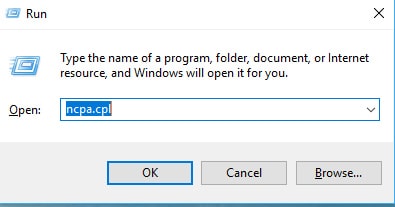
Now press "Windows key + R" and type "ncpa.cpl". It will open network connections. 
Step 1 How to share an internet connection  


Now "right-click" on the network adapter, that is connected to the internet. It can be your wireless adapter, ethernet adapter or any other USB modem. And from the drop-down menu, click on "Properties".
How To share an Internet connection (Step 2) 

Now select "Properties" and then click on "Sharing" tab. And now after that check the "Allow other users to connect through this computer's internet connection." And if you have more than one other network connections, then you need to select the connection on which you want to share your internet connection. Now click apply to make changes.
How to share an internet connection (Step 3)


You can also use different software for sharing Internet connection. Such softwares are used to convert your computer into a portable hotspot. Also, you can convert your laptop into a hotspot easily without any software.

This method works well with every version of windows such as windows 7,8 and Windows 10. 

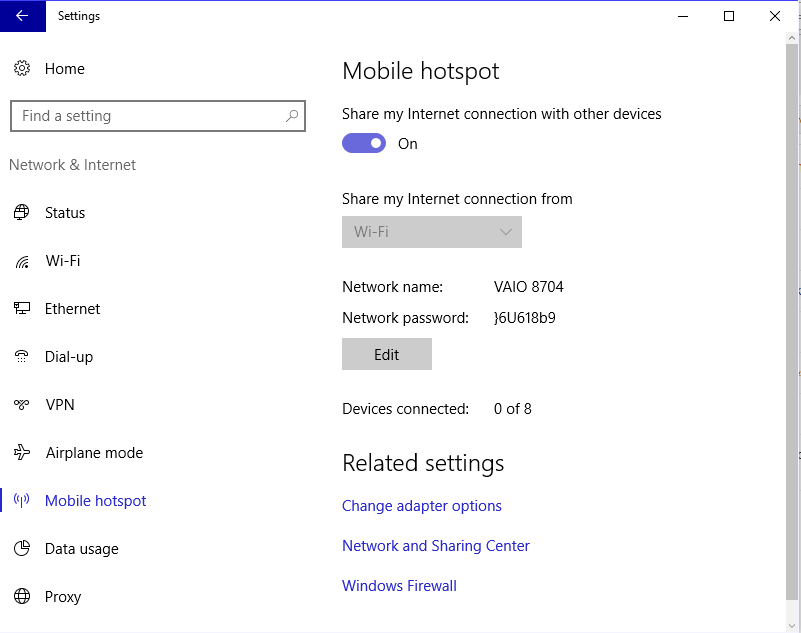
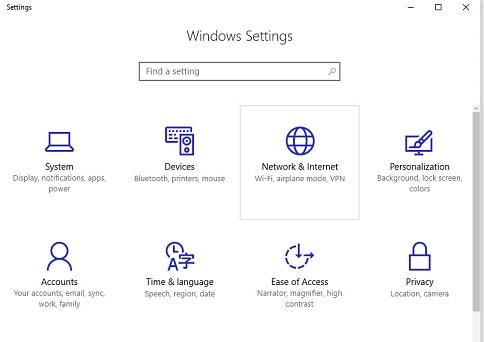
And if you have go Windows 10 Anniversary Update then go Setting by pressing "windows key +i" and after that click on "Network and Internet" and you will find "Mobile Hotspot" and you just need to turn it on and also turn on "Share my internet connection with other devices".

How to share an internet connection ( Step 4)


How To share an Internet Connection From your Cellphone 

Now first decide where you want to share internet from your cellphone. It you want to use your android cellphone internet on your PC then connect a data cable first. 

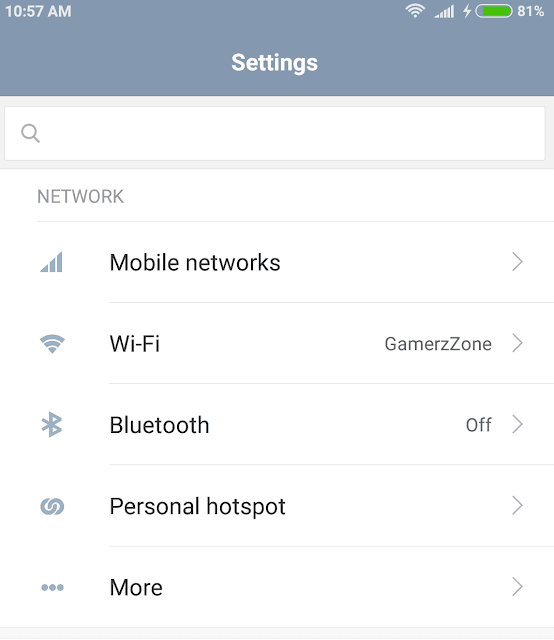
Now go to "Settings" and click on "more"
How to share an internet connection from Phone (Step 1)


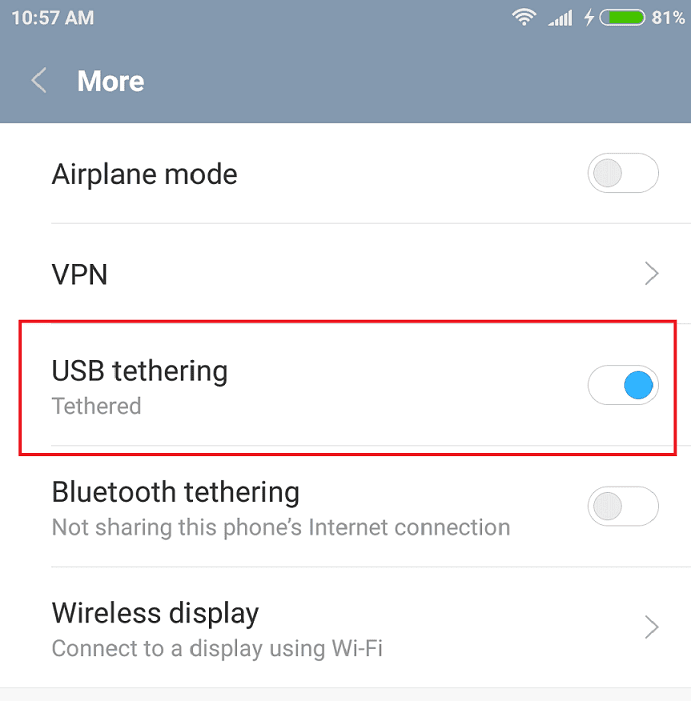
Now in a new window, you will find "USB Tethering". Turn it on. And that's all your cellphone's internet is now being shared with your Computer.
How to share an internet connection from phone (Step 2)


And if you want to share your Cellphone's internet with other wifi devices then you have to create a hotspot. And you can create your own hotspot on cellphone by navigating to settings and after that look for mobile "Hotspot". It is generally inside "More" in settings.


Final words on How to share an Internet connection

Now you have learned to share internet connection from your computer and cellphone. If you are sharing your cell phone's internet connection then first you need to make sure that does your Internet service provider allows sharing your mobile internet. As in some countries generally, ISP charges extra to share your internet connection. And in computers, you must be connected to two networks to enable sharing of internet connection. So if you have any suggestions on how to share an internet connection, then you can let us know.  

Thursday, 15 September 2016

How To Create A WIFI Hotspot in Your PC

So are you thinking about turning your computer into a wifi hotspot? A lot of time situation arrive when there are a lot of people at our home and, they need to use our internet on their own devices and sadly you don't have any router to share your internet connection. So you need to convert your laptop into a wifi hotspot.

Create a WiFi Hotspot in your PC   

How to Create a Wifi hotspot in Your PC
How To Create a WiFi Hotspot In PC

You can turn your laptop into wifi hotspot with few easy steps without using any third party software. Now to create a wifi hotspot you first check the wifi adapter of your Laptop. If it is off, then turn it on. Now after that Follow these steps

Open Command Prompt as an admin and type the following command
" netsh wlan set hostednetwork mode=allow ssid=my home key=1234567890 "  and after that press enter.
Set Up a Hosted network in PC


Now here ssid stands for your network name, you can change it as you desire and key stands for your network password. So your key must be more than 8 characters and must be strong and 1234567890 is definitely not strong. So create a strong Key. 

Now it's time to start that hosted network. To start your hotspot type the command " netsh wlan start hostednetwork" and hit "enter".  Now your laptop had been turned to WiFi hotspot.
Hosted Network Started

Now it's time to share your internet connection with your newly created wifi hotspot.

How to Create a Hotspot in Windows 10 PC (Anniversary Update Required)

So if you are lucky, who have got Windows 10 Anniversary update then windows had made hotspot creation hassle free. 
First click on Setting or use shortcut key "Windows +I" to open settings. 
Windows 10 Anniversary Update Settings

Now after that click on "Network and Internet" 

Turn On Mobile Hotspot To Create a Wifi Hospot in Your PC

Now after that, look for "Mobile Hotspot" from the list on the left side. And click on it. Now turn on "Share my Internet Connection With Other Devices"  and also you can edit the network name and network password just by clicking on "Edit".

And you are ready to Go. Just ask your friend to open WiFi on their devices and enter the password. 


Create a WiFi Hotspot on your PC Using Software 

If you are too lazy to type all those commands, and also you don't have Windows 10 Anniversary Update, then these software might be of your Use.

Connectify Hotspot is used to turn your computer into wifi hotspot and it is a paid software, however you can download it and try it first. It have a lot of cool features including wi-fi repeater mode, which turns your laptop into a wifi repeater, if you already have a wi-fi router then you can extent it's wireless range with connectify hotspot. Also it is easy to use and you can create bridge between your various devices. You can Get Connectify Hotspot and turn your computer into wifi hotspot.


MyPublicWiFi is a free software, which you can use to create a wifi hotspot in your PC and with it you can share your internet connection with all other devices in your room. The best part is that it is free and also you can restrict certain servers on your network by MyPublicWifi. Also with it you can collect log files of visited websites. You can Get MyPublicWifi and convert your PC into wifi Hotspot.

mHotspot is a free software that will create a wifi hotspot in your computer. It can connects maximum upto 10 users to your computer hotspot. It can share any type of internet connection. Also it can work as a repeater. You can also keep an eye on network usage such as transfer rates. And mHotspot works perfectly with windows 7,8 and 10. You can get mHotspot and convert your PC into a Wifi Hotspot. 

Final Words on Creating a WiFi Hotspot 

A wifi hotspot is just not used for sharing internet connection, you can try create a network for playing multiplayer games in your network. And why to buy a router if you just want to share your internet connection with your two or three wireless devices in a single room. But if you are a serious gamer or you have multistory house, then you can go for a router of high power else you can enjoy your internet connection on your other devices by creating a WiFi hotspot in your PC either by commands or some software.

Thursday, 8 September 2016

How to Download Photos From Instagram

A lot of times while surfing Instagram you might found some awesome photo and want to get into your cellphone or computer, then here is how you can download photos from Instagram while using Instagram on your computer or cell phone. 

How To Download Photos From Instagram On PC (2016)

Yesterday, when I was surfing Instagram on My PC then I wanted to download a photo to my computer from Instagram, but when I tried to right click on that image; there was no option of 'save Image as'.

So I found an alternative way to download that photo on my computer. So here were the steps that I followed.

If you want to see all this live in action then here is video version on 'How to download Photos from Instagram', else scroll down.


Open the photograph that you want to download.
Open Photo on your Instagram First on PC
Open the Image on your Instagram First

Now after you opened that photo on your PC,  'Right Click' on the photo and then you will see a menu. Now click 'Inspect' and a code will open on either side of your browser's window.
Click on Inspect  to open code in Instagram
Click on Inspect 
Now a code window will open on either side of your browser with a highlighted code line. Simple press 'delete'. Make sure your image must be highlighted.

Delete the highlighted code in your instagram window
Delete the highlighted code

Now after pressing Delete, move your cursor on the image and right click again. Now a menu with 'Save image as' will appear. Click on it and in a separate window  you will be prompted to save the photo to a certain location. Press save and that's all. You have got your Instagram photo to your computer.
Click on Save image as... To save photo from instagram
Click on Save image as...


How to Download Photos From Instagram on Phone 2016


As the most of the people are using Instagram on their cellphone, it may be android, iOS or any other mobile operation platform so, there is a way to download photos from Instagram on your android phone. Just follow these steps and you will be happy having your favourite photograph on your mobile device.

Now you need two important apps to do this. Of course, you have Instagram and download UC browser.

Now open Instagram app and then on the top right of instagram photo you will see three dots. Click on then and there will be a menu in front of you. Now select 'Copy Share URL'.
Press Copy Share URL in Instagram
Press Copy Share URL

Now after that, it's time to open UC Browser. Now tap on the address bar of UC browser for more than 2 seconds and a menu will appear. Select 'Paste and Go.'
On UC Browser select Paste and Go to open instagram photo
On UC Browser select Paste and Go 

 Now after the Photo from Instagram will load in your UC browser, tap on the image and you will find 'Save Image'  and that's all click on it and photo is on your Cellphone now. 

So Are you Lazy of this hassle for getting Instagram image ?


So if you are Lazy  or you are unable to find 'Copy Share URL' then the simplest way to Download photos from Instagram is to take a Screenshot on your Instagram app and then after that edit and that's all, you have got your Photograph. Now if you found this article useful then don't forget to share it with your friends on your social network.

Sunday, 4 September 2016

Reliance Jio Compatible Phones List

Though Reliance Jio 4G services will start from September 5, but before that, people are in a long queue to get it. And as Reliance has said that Jio is only true 4G service provider, so not all phones will support Jio Sim. So here is the latest list of Reliance Jio Compatible Phone supporting jio services. 

Reliance Jio Compatable Phones 

Reliance Jio Compatible Phones List
Reliance Jio Compatible Phones 
Reliance had already announced partnership with cellphones manufacturers and these are Samsung, HTC, Micromax, Sony, Vivo, Intex, Lava, Gionee, Panasonic, Asus, Xolo, LG, Karbonn, Videocon, YU, Sansui, Alcatel and TCL.  So if you are proud owner of a 4G compatable cellphone there is the list of compatable phones that will support it's 4G services with VoLTE. However VoLTE services will only applicable to supported phones.

Reliance Lyf

Lyf is a series of smartphone by Reliance which had been released this year in 2016. And all Lyf phones support Jio services and also comes with a free jio SIM.

Reliance LYF Earth 1                  Reliance LYF Earth 
Reliance LYF Flame 1                 Reliance LYF Flame 2  
Reliance LYF Flame 3                 Reliance LYF Flame 4 
Reliance LYF Flame 5                 Reliance LYF Flame 6  
Reliance LYF Flame 7                 Reliance LYF Flame 8 
Reliance LYF Water 1                 Reliance LYF Water 10 
Reliance LYF Water 2                 Reliance LYF Water 3 
Reliance LYF Water 4                 Reliance LYF Water 5 
Reliance LYF Water 6                 Reliance LYF Water 7  
Reliance LYF Water 8                 Reliance LYF Wind 1(16GB) 
Reliance LYF Wind 1(8GB)       Reliance LYF Wind 2
Reliance LYF Wind 3                 Reliance LYF Wind 4
Reliance LYF Wind 5                 Reliance LYF Wind 6 
Reliance LYF Wind 7

So you can Get these LYF phones from a nearest Reliance store along with a Jyo Sim Card or if you can get them online at amazon 

Samsung 

Samsung A8 VE (SM-A800I)   

Samsung Galaxy A5 (SM-A500G)

Samsung Galaxy A5 (2016) (A510FD) 

Galaxy A7 (SM-A700FD) 

Samsung Galaxy A7 (2016) (A710FD)

Samsung Galaxy A8 (SM-A800F) 

Samsung Galaxy Core Prime 4G (SM-G360FY) 

Samsung Galaxy J2 (2016) (SM-J210F) 

Samsung Galaxy J3 (2016) 

Samsung Galaxy J5 (SM-J500F) 

Samsung Galaxy J7 (SM-J700F) 

Samsung Galaxy te 4 (SM-N910G)  

Samsung Galaxy te 4 Edge (SM-N915G) 

Samsung Galaxy te 5 (SM-N920G)  

Samsung Galaxy S6 (SM-G920I)  

Samsung Galaxy S6 Edge (SM-G925I)  

Samsung Galaxy S6 Edge Plus (SM-G928G) 

Samsung Galaxy-J2 (SM-J200G)  

Samsung J Max  

Samsung J5 (2016) (SM-J510F)  

Samsung J7 (2016) (SM-J710F) 

Samsung te 5 Duos (SM-N9208) 

Samsung ON5 (SM-G550FY) 

Samsung ON5 Pro(SM-G550FY) 

Samsung ON7 (Mega On – SM-G600FY) 

Samsung ON7 Pro(SM-G600FY) 

Samsung S7 (SM-G930F) 

Samsung S7 Edge (SM-G935F) 

Samsung Galaxy J2 Pro 

Samsung Galaxy te 7 

Samsung Z2

Asus

Asus Zenfone 3 Deluxe ZS570KL 

Asus Zenfone 3 Ultra (ZU680KL) 

Asus Zenfone 3 ZE552KL (Libra) 

Asus Zenfone 3 Laser ZC551KL (Scorpio) 

Asus Zenfone 3 ZE520KL (Leo)

BlackBerry

BlackBerry Priv (STV100-3)

Coolpad

Coolpad Max 

Coolpad Mega 2.5D (Y83)

Gionee

Gionee F103 (2 GB)

Gionee S Plus  

Gionee F103 (3 GB) 

Gionee Elife S6  

Gionee M5 Plus 

Gionee P5L 

Gionee F103 pro 

Gionee S6s

Infocus

Infocus M370

Infocus M535 

Infocus M680 

Infocus M370I 

Infocus M535+

Intex

Intex Cloud String 

Intex Aqua Eco 4G

Intex Aqua 4G 

Intex Aqua Ace 2  

Intex Aqua Craze  

Intex Aqua Power 4G 

Intex Aqua S7 

Intex Cloud String V2.0 

Intex Aqua Ace Mini 

Intex Aqua Strong 5.1 

Intex Aqua Raze 

Intex Aqua 4G Strong 

Intex Aqua Shine 4G 

Intex Aqua Music 

Intex Aqua Secure 

Intex Aqua View

Karbonn

Karbonn Aura  

Karbonn Quattro L45 IPS 

Karbonn Quattro L55 HD 

Karbonn Aura Power

Lava

Lava X10 

Lava X28 

Lava X81 

Lava V5 

Lava X50 

Lava A71 

Lava A72 

Lava A88 

Lava A76 

Lava A89

Lava X46 

Lava X38 

Lava X38 (2GB) 

Lava X17 

Lava X11 

LeEco 

LeEco Le 2 

LeEco Le Max 2 

Lenovo 

Lenovo Vibe Shot 

LG 

LG XCAM (K580i) 

LG X Screen (K500I) 

LG Google Nexus 5x (LG-H791) 

LG G4 Stylus 4G 

LG G5 

LG Spirit 4G H442 

LG K7 

LG K10 

LG Stylus 2 Plus 

LG K520 – Stylus 2 

Micromax 

Micromax YU Yunique Plus 

Micromax YU Yunique YU4711 

Micromax Canvas Sliver 5 (Q450) 

Micromax Canvas Amaze (Q491) 

Micromax Yu Yuphoria (YU5010A) 

Micromax Yu te (YU6000) 

Micromax Canvas Mega 2 Q426 

Motorola 

Motorola Moto G (3rd Gen) 

Motorola New Moto E (Moto E 2nd Gen)

Motorola Moto X Play, Motorola G Turbo

Motorola G4 

Motorola G4 Plus

Oneplus 

Oneplus 3 

Onida 

Onida I4G1 

Oppo 

Oppo F1 

Oppo A37 

Oppo F1 Plus 

Oppo F1S 

Panasonic 

Panasonic P55 vo 4G 

Panasonic Eluga Arc 2 

Panasonic Eluga I2 (2gb) 

Panasonic Eluga I2 (3gb) 

Panasonic Eluga Arc 

Panasonic Eluga Icon 2 

Panasonic Eluga I3 

Panasonic Eluga A2 

Panasonic Eluga 

Sony  

Sony Xperia Z5 Dual (E6883) 

Sony Xperia Z5 Premium Dual 

Sony Xperia X (F5122) 

TCL 

TCL 560 

TCL 562 

Videocon 

Videocon Krypton 3 V50JG 

Videocon Graphite 1 V45ED (4 Band) 

Videocon Graphite 1 V45ED (6 Band) 

Videocon Q1 

Vivo 

Vivo Y21L 

Vivo V3 

Vivo V3 Max 

Xiaomi 

Xiaomi Redmi 2 Prime (H2X)

Xiaomi Redmi te 3 (H3A)

Xiaomi Mi5 

Xiaomi Mi Max 

Xiaomi Redmi 3s 

Xiaomi Redmi 3s Prime 

Xolo 

Xolo Era 4G

Xolo era 1X  

Xolo era 2X  

Xolo era 4K  

Xolo era X


YU

YU Yuphoria  

YU Yureka Note  

YU Yureka S  

YU Yureka Plus 

YU Yunique  

YU Yunique Plus  

YU Yunicorn


So These were some of the Reliance Jio Compatible phones. If you Haven't found your cellphone in the list Don't worry you can visit Indian Express for full Detailed Article. And also if you have reliance jio and it is working on your phone then you can mention the phone model in comments.

Saturday, 3 September 2016

What is Reliance Jio Sim Card And How Can you Get It

What is Reliance Jio sim Card and How to Get it
Reliance Jio is a service provider which provide broadband and digital services on mobile networks by Jio Sim Card  in India and is officially know as Reliance Jio Infocomm Limited (RJIL). Reliance Jio only provides 4G LTE services and claims that it's the only true 4G service provider in India. Jio Services were launched in 27th December 2015 on the Eve of Dhirubhai Ambani's  birth anniversary and were in BETA testing. And on 1 September 2016 Jio officially launched for everyone.
Jio Sim Card      
As like normal SIM cards Jio offers it's 4G services through a Sim Card. This SIM card is not supported by all Cellphones, But Reliance Promises that it will be compatible with all devices that support 4G after 5th September 2016. However, Jio Sim is supported by selected cellphones which support VoLTE. But if you are planning a cheap cellphone then you can get jio sim free with LYF phones which support 4G LTE. 


UPDATE : Check whether you Cellphone is Reliance Jio Compatible 


Why Jio 

  • Voice Calls To Any Network in India Are Free.
  • SMS are Free.
  • Jio SMS Services Free on Diwali And other Days.
  • Cheap High-Speed Data Packs.
  • Free Services till December 31, 2016


How To Get Jio Sim Card       

You can get Jio Sim from Reliance Digital Stores free of cost and after announcement, these sim cards will be available in nearest telecom stores too. If you have 4G VoLTE compatible cellphone, then you can download MyJio Android app to check the nearest Reliance Digital stores. Also, you can find the location of the store using Jio Locator.

If you are planning to Buy Jio Sim today, then don't forget to bring your Aadhar card and two photographs along with photocopies and original documents. You might have to register first and after few days you will get your Jio sim. But if you are planning to get Jio with LYF phone, you can get the new prepaid connection without waiting.

Activating Jio Sim

After you received your Sim card, the steps for activation will be sent to on your registered email address. Also, the billing process is online so you will get the receipt by your email or SMS. SIM card will be activated after tele-verification. Also it is reported that Jio Sim comes with IMEI locking so that means you can't use it on other cellphones. It's still true or Not, will be verified by Reliance Store. So don't forget to ask. 

Activating VoLTE 
To activate Free all India VolTE calls over jio network, you will need to make a call on 1977 for the tele-verification process and you will be asked for purchase bill and other documents.

Why services on Jio Sim are Free ?

As commercial launch will happen in 2017, so it is still in testing phase and that's why it's all services are free of cost till December 31, 2016. So you might found a glitch in the network.

Final Words on Reliance Jio 

Reliance jio is spreading among people so fast because of it's free services till 31'st December 2016. Also it have it's cheap data plans along with Free 4G calling all over the India. And right now it is all over the headlines and is very far ahead of Other telcom companies. If everything goes all right, Reliance Jio will be revolutionising India soon in near months.

So Are you going to Buy a Reliance Jio Sim Card ? 


Hey, we've just launched a new account on Twitter You'll like to connect - https://twitter.com/theguyscomputer
Join Our Newsletter